
Tile installation means bonding ceramic, porcelain, natural stone, or glass tile to floors, walls, or wet-area surfaces using thinset mortar, grout, and the right substrate. In Greater Boston, professional installation costs $10–$25 per square foot all-in (as of 2026 pricing), depending on tile type, room complexity, and labor. A properly installed tile floor lasts 20–50 years with minimal upkeep. This guide covers materials, costs, room-specific tips, and how to hire a qualified installer.
- Labor costs in Greater Boston typically run $7–$14 per square foot (as of 2026 pricing), with premium natural stone or complex patterns adding more.
- Material costs range from $1–$2/sq ft for ceramic up to $15–$30/sq ft for natural stone — tile type is the biggest budget variable.
- Order 10–15% extra tile to account for cuts, waste, and future repairs — standard across all installation types.
- Subfloor deflection must meet the L/360 standard per TCNA guidelines — floors that flex too much crack tile and grout.
- Wet areas like showers require a waterproofing membrane (such as Schluter DITRA or Laticrete Hydro Ban) before any tile goes down.
- Curing time matters: wait 24–48 hours before grouting and 72 hours before foot traffic on a newly tiled floor.
Christian Aguirre and the team at Aguirre Modern Tile have completed 500+ tile projects across Greater Boston in over 15 years as certified installers. This guide reflects real-world experience. Planning a bathroom or kitchen tile project? Get a free porcelain or ceramic floor tile installation estimate — tell us your room type and square footage and we'll send a same-day written quote.
What Is Professional Tile Installation and What Does It Include?
Professional tile installation is the full process of preparing a surface, selecting the right materials, setting tile, and finishing with grout and sealant. It includes substrate assessment, waterproofing where needed, layout planning, and a warranty on the work.
Most homeowners focus on the tile itself. Professional installers focus on what goes underneath. A tile project fails at the substrate level — not at the tile level. That means checking for flex, moisture, and level before a single tile goes down.
A complete professional installation includes:
- Substrate inspection and repair (patching, leveling, or adding backer board)
- Waterproofing membrane installation in all wet areas
- Layout planning with chalk lines and dry-fit checks
- Thinset mortar application with the correct notch trowel
- Tile setting with spacers and leveling clips
- Grouting, cleaning, and sealing
- Caulking at all movement joints (countertops, tub edges, transitions)
A certified installer also selects the right products for your specific conditions — heated floors, wood-frame subfloors, older Boston homes — and provides written documentation of the materials used so you can match them for future repairs.
How Much Does Tile Installation Cost in Greater Boston?
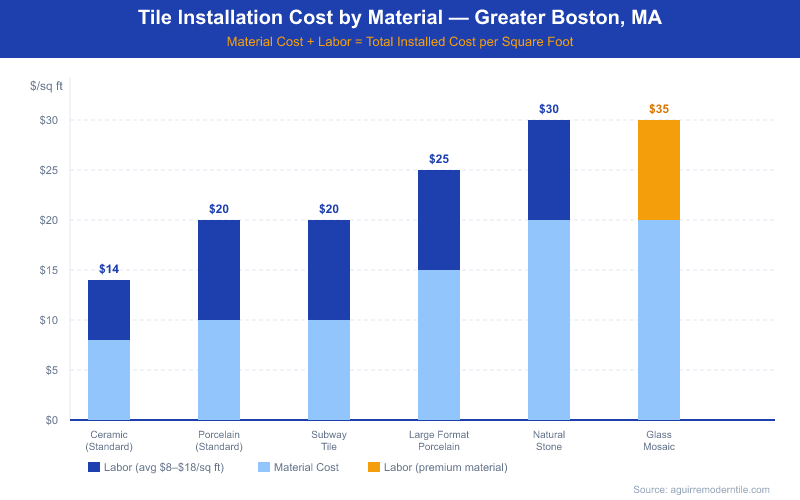
Professional tile installation in Greater Boston costs $10–$25 per square foot all-in (as of 2026 pricing). That figure combines labor and materials. The exact number depends on tile type, room size, substrate condition, and pattern complexity.
Here's how a typical project breaks down:
- Labor: $7–$14 per square foot for standard installations. Complex patterns like herringbone or diagonal add $2–$4/sq ft.
- Tile material: $1–$30 per square foot depending on type (see table below).
- Substrate and prep: Backer board, waterproofing membrane, and leveling compound add $1–$3/sq ft on average.
- Grout and thinset: Budget roughly $0.50–$1.50/sq ft for consumables.
Tile Type | Material Cost (per sq ft) | Typical Labor (per sq ft) | Total Installed Range |
|---|---|---|---|
Daltile Ceramic (standard) | $1–$4 | $7–$10 | $8–$14/sq ft |
MSI Porcelain (20x20 or 12x24) | $3–$8 | $8–$12 | $11–$20/sq ft |
Daltile Subway Tile (3x6 ceramic) | $2–$5 | $7–$10 | $9–$15/sq ft |
MSI Calacatta Gold Porcelain | $6–$12 | $10–$14 | $16–$26/sq ft |
Natural Stone (Carrara Marble) | $10–$30 | $12–$18 | $22–$48/sq ft |
Glass Mosaic (1x1 or 2x4) | $8–$20 | $12–$16 | $20–$36/sq ft |
Room size shapes the total bill. A standard Boston bathroom floor runs 45–60 square feet. A kitchen floor runs 120–200 square feet. A full shower enclosure — walls and floor — typically lands between 80–120 square feet. Based on current Greater Boston rates (as of 2026), a bathroom floor costs $540–$1,400 and a full shower runs $960–$3,000+ depending on tile selection.
One cost factor most homeowners overlook is subfloor condition. Boston's older housing stock — Victorians, triple-deckers, Colonials — often has uneven or bouncy subfloors that need leveling before tile goes down. A thorough pre-installation assessment prevents surprise charges.
What Types of Tile Can Be Professionally Installed?
Tile type determines installation complexity, durability, and long-term maintenance. Match the tile to the use case first, then choose aesthetics. The wrong tile in the wrong application causes early failure.
- Ceramic tile: Fired clay with a glazed surface. Affordable at $1–$4/sq ft. Best for walls and low-to-medium traffic floors. Not suitable for outdoor use in Boston's freeze-thaw climate.
- Porcelain tile: Dense, low-water-absorption tile (under 0.5% per ANSI standards). Requires a quality wet saw. Excellent for floors, showers, and outdoor use. $3–$12/sq ft for standard options. The most versatile choice for Greater Boston homes.
- Natural stone (marble, travertine, slate, granite): Each type has unique installation requirements. Marble needs white thinset to prevent bleed-through. Travertine is porous and needs sealing before grouting. Material costs run $10–$30+/sq ft.
- Glass tile: Requires a glass-cutting blade or tile nippers. Needs white thinset. Best for backsplashes and shower accents. $8–$20/sq ft for material.
- Large-format porcelain slabs (24x48, 48x96): Popular in Boston condo renovations. Require a strong, flat substrate and two-person handling with suction cup lifters.
Boston Home Style Tile Pairings
- Victorian and triple-decker homes: Hex mosaic floors, subway tile wainscoting, Carrara marble accents — classic looks that match the era.
- Colonial and Cape Cod homes: 12x12 or 18x18 porcelain in warm tones, simple grid patterns, neutral grout.
- Modern condos and new construction: Large-format porcelain (24x48), minimal grout lines, matte finish.
- Converted industrial lofts: Concrete-look porcelain, oversized format, charcoal grout.
How Do Professional Tile Installers Prepare a Surface?
Surface preparation is the most important part of any tile installation. A flat, rigid, properly bonded substrate is the foundation every successful tile job needs. Experienced installers spend more time on prep than on setting tile.
Subfloor Types and What They Require
- Concrete slab: Ideal for tile. Check for cracks, high spots, and moisture. Patch and flatten before tiling. No backer board needed in most cases.
- Plywood over joists: Common in Boston homes. Requires cement board (like HardieBacker) or Schluter DITRA over the plywood. Combined thickness must be at least 1-1/8 inches for stability.
- Older wood subfloor (board-style): Found in pre-war Boston homes. Often requires a plywood layer first, then backer board. Squeaks must be screwed down before tiling.
- Radiant heat floors: Common in Boston condo renovations. Use uncoupling membranes like Schluter DITRA-HEAT to protect heating elements and prevent cracking.
Skipping self-leveling compound to save a day adds years of maintenance problems. Check for flex, check for level, and fix both before you open a bag of thinset.
Boston's older housing stock creates unique challenges. Pre-war homes often have board-style subfloors with decades of settling. Triple-deckers have shared floor systems that flex more than modern construction. In our experience across 500+ Greater Boston projects, substrate remediation adds $200–$800 to the average bathroom job — but skipping it costs far more in repairs.
What Is the Tile Installation Process Step by Step?
Professional tile installation follows a set sequence. Skipping any step — especially early ones — causes failures that are expensive to fix.
- Assess and prep the substrate. Check for flex, level, and moisture. Patch, level, or add backer board as needed.
- Apply waterproofing membrane in any wet area (showers, tub surrounds, bathroom floors).
- Plan the layout. Find the visual center of the room. Snap chalk lines. Confirm cuts at doorways will be at least half a tile wide.
- Mix and apply thinset mortar. Use the correct notch trowel size for your tile. Back-butter large-format tiles for full contact coverage.
- Set the tile. Press each tile firmly into thinset. Use spacers and a leveling system for tiles over 15 inches.
- Allow thinset to cure. Wait 24–48 hours before grouting. In cold Boston winters, wait the full 48 hours.
- Apply grout. Work in 4–6 sq ft sections. Clean haze with a barely damp sponge before it hardens.
- Seal grout and stone. Apply a penetrating sealer within 72 hours of installation on cement grout and natural stone.
- Caulk movement joints. Fill the gap at countertops, tub edges, and floor transitions with caulk — not grout.
How Long Does Tile Installation Take by Room Type?
Most tile projects in Greater Boston take one to seven days. These timelines include installation and grout cure time, based on our experience across 500+ projects.
- Kitchen backsplash (30–60 sq ft): 1–2 days total
- Bathroom floor (45–60 sq ft): 1–2 days installation, 1 day grout — 3 days before use
- Full shower enclosure (walls + floor): 3–5 days including waterproofing cure time
- Full bathroom (floor + walls + shower): 5–7 days depending on scope
- Kitchen floor (120–200 sq ft): 2–3 days installation, 1 day grout
Cold Boston winters extend cure times. An unheated space in February may need 48–72 hours before grouting is safe. Thinset and grout should not be applied below 50°F. Provide temporary heat if needed.
Bathroom and Shower Tile Installation
Bathroom tile installation requires more prep than any other room. Water causes adhesion failure. Every wet-area installation must include a waterproofing membrane before tile goes down. Without one, moisture works behind the tile, destroys the substrate, and causes mold and structural rot.
What Is a Waterproofing Membrane?
A waterproofing membrane is a water-blocking layer applied over cement board or concrete before tile goes down in wet areas. Industry-standard products include Schluter DITRA, Laticrete Hydro Ban, and MAPEI AquaDefense. Sheet membranes like DITRA also decouple the tile from the substrate. This reduces cracking from floor movement — a critical benefit in older Boston homes with wood-frame construction.
Shower pan installation is its own discipline. A properly built shower pan uses a pre-sloped mortar bed or a prefabricated foam shower base. It also needs a waterproof liner or bonded membrane and a drain assembly that integrates with the waterproofing layer. In our 15+ years of experience as certified installers, improperly built shower pans are the leading cause of shower tile failures in Greater Boston homes.
For shower floors, choose tiles with a COF (coefficient of friction) rating of 0.42 or higher — the TCNA-recommended minimum for wet surfaces. Mosaic tiles (2x2 or smaller) provide more grout lines and better traction. For shower walls, large-format porcelain (12x24 or 24x48) reduces grout joints and cuts cleaning time.
Bathroom floors in Boston's older homes often need work before tile goes down. Wood subfloors must be rigid — flex causes grout cracks. We typically install Schluter DITRA over plywood subfloors. This both waterproofs and decouples, eliminating the need for cement board in many cases.
Floor Tile Installation Guide
Floor tile installation starts with the subfloor. Every problem that develops later traces back to what's underneath. Per TCNA guidelines, floors must meet the L/360 deflection standard: for every 360 inches of span, the floor can flex no more than 1 inch. More flex will crack tile and grout within months — regardless of how well the tile is set.
Layout planning is the next step. Find the visual center of the room, not the geometric center. Snap chalk lines before any mortar goes down. Tile cuts at doorways and walls should be at least half a tile wide. Narrow slivers at entries look poor and are structurally weak.
Large-format floor tiles (24x24 or larger) require a back-buttered application — thinset on both the tile and the substrate. According to TCNA guidelines, mortar coverage must reach 95% in wet areas and 80% in dry areas. Low coverage leads to hollow spots, tile rocking, and cracked edges under load.
Large tiled areas also need movement joints every 8–12 feet per TCNA guidelines. Boston's climate swings from below zero to 90°F. Expansion joints are not optional — they're essential for long-term performance.
Kitchen and Backsplash Tile Installation
Kitchen backsplash tile installation is the most DIY-accessible tile project. A typical kitchen backsplash runs 30–60 square feet and takes 1–2 days to install professionally, including grout cure time. But it still has real failure points.
The most important prep step is cleaning and deglossing the wall surface. Paint, grease, and drywall primer all reduce adhesion. For kitchen walls, we use a non-sag thinset mortar (like MAPEI Kerabond T) to prevent tiles from slipping on vertical surfaces before the mortar sets. On standard painted drywall above the counter in a non-wet zone, mastic adhesive is acceptable. Thinset is always the more durable choice.
Backsplash Layout Tips
- Start layout from the center of the most visible wall — typically behind the range or cooktop.
- Mark outlets and switches on the wall before snapping layout lines.
- For subway tile in a running bond pattern, offset each row by exactly 1/3 or 1/2 of the tile length.
- Use tile nippers or a wet saw with a fine blade for cuts around outlet boxes.
- Leave a 1/8-inch gap at the countertop and fill it with caulk — the counter moves seasonally and grout will crack.
Grout selection matters more in kitchens than most people think. Use sanded grout for joints wider than 1/8 inch and unsanded for narrower joints. For kitchens, consider Mapei Flexcolor CQ or Laticrete SpectraLOCK epoxy grout. Both resist staining from grease and coffee without annual sealing. Light-colored cement grout in a kitchen will stain within a year without regular sealer application.
DIY vs. Professional Tile Installation: Which Is Right for Your Project?
DIY tile installation works for simple, small, dry-area projects — a small laundry room floor, a straightforward backsplash, or a basic bathroom floor with standard 12x12 ceramic. It's not a good fit for showers, large-format tile, natural stone, radiant heat floors, or any space where the subfloor needs significant prep.
Tools You Actually Need for DIY Tile Installation
- Wet tile saw (rental: $50–$80/day) — essential for straight cuts
- Tile nippers — for small curved cuts around pipe flanges
- Notched trowel — 3/8-inch V-notch for most floor tiles; larger for big-format tiles
- Rubber mallet — for setting tile without damaging faces
- Tile spacers — 1/16 inch for wall tile, 1/8 or 3/16 inch for floor tile
- Tile leveling clips and wedges (Raimondi or Tuscan Leveling System) — critical for large-format tile
- Grout float — for pressing grout into joints
- Mixing paddle and bucket — for thinset and grout
- 4-foot level and chalk line — for layout
Common DIY Mistakes That Lead to Failure
- Skipping substrate prep — tiling over a bouncy or uneven floor
- Using mastic in a wet area — mastic fails when saturated
- Grouting too soon — thinset needs 24–48 hours to cure before grouting
- Not back-buttering large tiles — leads to hollow spots and cracked edges
- Ignoring expansion joints — causes grout cracking within 1–2 years
- Misaligned layout — the most visible and hardest mistake to fix
Call a pro if the subfloor needs leveling, if you're tiling a shower, if you're working with natural stone, or if tiles are larger than 18x18. The material cost alone justifies professional installation when you're working with $15–$30/sq ft stone tile.
Tile Patterns and Design Ideas
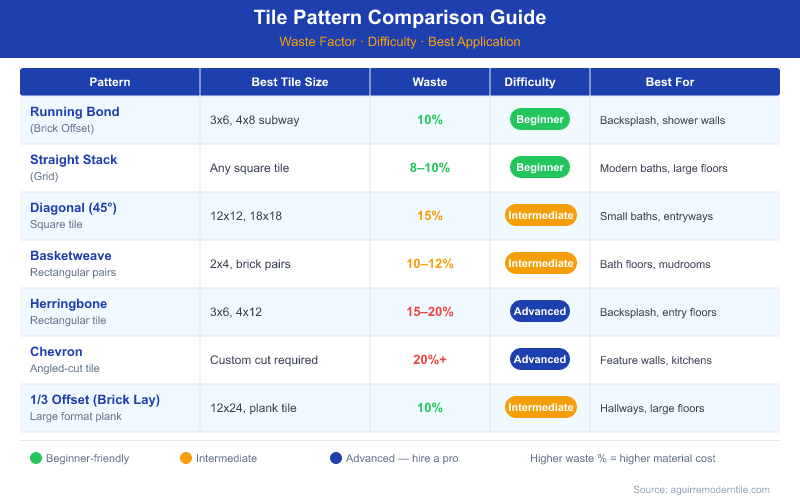
Tile pattern choice affects installation time, material waste, and visual impact. Some patterns are beginner-friendly. Others require experienced hands to execute cleanly.
Pattern | Best Tile Size | Waste Factor | Difficulty | Best Application |
|---|---|---|---|---|
Running Bond (Brick Offset) | 3x6, 4x8 subway | 10% | Beginner | Backsplash, shower walls |
Straight Stack (Grid) | Any square tile | 8–10% | Beginner | Floor, large-format walls |
Herringbone | 3x6, 2x8, 4x12 | 15–20% | Intermediate | Backsplash, bathroom floor accents |
Diagonal (45°) | 12x12, 18x18 | 15–20% | Intermediate | Floor tile in square rooms |
Basketweave | 2x2 + 1x2 mosaic | 10–12% | Intermediate | Bathroom floor, shower floor |
Large-Format Offset (33% or 50%) | 24x48, 12x24 | 10–15% | Advanced | Modern condo floors, shower walls |
One important note about large-format tiles in a 50% offset: the TCNA recommends no more than a 33% offset for tiles with a facial dimension longer than 15 inches. A 50% offset on 12x24 or 24x48 tiles highlights subfloor variation and causes lippage. Lippage is when one tile sits higher than its neighbor — it looks poor and creates a tripping hazard.
Herringbone is the most requested pattern in Boston kitchen backsplash projects. It adds 15–20% more material waste and takes longer to install. Based on current Greater Boston rates (as of 2026), expect to add $2–$3/sq ft to labor for herringbone compared to straight stack.
Essential Tools and Materials for Tile Installation
Professional tile installation requires the right materials from the start. Substituting inferior products — especially for adhesives, waterproofing, or grout — leads to early failure.
Thinset Mortar
- Modified thinset (polymer-enhanced, like MAPEI Ultraflex 2 or Laticrete 254 Platinum): Use for most floor and wall tile on cement board, concrete, or plywood. Better bond strength and flexibility.
- Unmodified thinset (no polymer additives, like MAPEI Kerabond): Required under some waterproofing membranes like Schluter KERDI. Read the membrane manufacturer's instructions — using modified thinset under certain membranes voids the warranty.
- Epoxy thinset: Chemical-resistant and very strong. Used in commercial kitchens and industrial settings. Difficult to work with and expensive.
A standard 50-lb bag of thinset covers approximately 40–50 square feet at 3/8-inch notch depth. Coverage drops for large-format tiles that require back-buttering. Plan for 15% extra as a buffer.
Grout Types
- Sanded cement grout (like Mapei Keracolor S): For joints wider than 1/8 inch. Standard for floor tile.
- Unsanded cement grout (like Mapei Keracolor U): For joints 1/16–1/8 inch wide. Used for wall tile and polished stone — sanded grout scratches polished surfaces.
- Epoxy grout (like Laticrete SpectraLOCK Pro or Mapei Kerapoxy): Stain-proof, chemical-resistant, no sealing required. Best for kitchens, showers, and commercial floors.
Substrate and Underlayment Options
- HardieBacker cement board (1/2 inch): Standard backer board for floors and walls.
- Schluter DITRA (uncoupling membrane): Bonds to plywood and provides waterproofing and decoupling. Excellent for wood-frame homes.
- Laticrete Hydro Ban sheet membrane: Full waterproofing system for showers and wet areas.
- Self-leveling compound (like Mapei Planipatch): Flattens substrate high spots before tiling.
Tile Spacers and Leveling Systems
- 1/16 inch: Rectified porcelain wall tile, tight-joint modern look
- 1/8 inch: Standard floor tile, most bathroom wall tile
- 3/16 inch: Natural stone with slight edge variation
- 1/4 inch: Rustic or handmade tile, outdoor applications
For tiles larger than 15 inches, use a tile leveling system (like Raimondi Raylevel or Tuscan Leveling System). These clips and wedges keep adjacent tiles flush during the set and eliminate lippage from subfloor variation.
Why Choose Aguirre Modern Tile for Tile Installation in Greater Boston?
Professional tile installation pays for itself when failure would be expensive, the substrate needs work, or the tile material is difficult to handle. Across 500+ projects in Greater Boston, we see the same pattern: homeowners attempt a shower or large-format floor install, hit a problem mid-project, and call us to fix it. Demolition and redo costs more than getting it right the first time.
How to Find and Vet a Tile Contractor
- Verify Massachusetts contractor registration through the state's Office of Consumer Affairs and Business Regulation before signing anything.
- Ask for a portfolio of completed projects — specifically in the room type you're tiling (shower, floor, backsplash).
- Ask about substrate prep — a good installer talks about the subfloor before they talk about tile.
- Get a written scope of work — materials specified by brand and type, square footage, timeline, and payment schedule.
- Ask about warranty — reputable installers stand behind their work. Ask what's covered and for how long.
Red Flags to Watch For
- Quotes significantly lower than others — usually means skipped prep or inferior materials
- No written contract or itemized quote
- Requests for full payment upfront
- No answer when you ask about waterproofing in a shower project
- Can't name the thinset or waterproofing products they plan to use
Permits may be required for tile work in Massachusetts when it's part of a bathroom remodel involving plumbing rough-in or structural changes. Tile-only replacement projects typically don't require a permit. Contact us and we can clarify what applies to your project.
Pro Tips and Common Mistakes to Avoid
Across 500+ completed tile projects in Greater Boston, as certified installers we see the same mistakes repeatedly. Most are avoidable with planning and patience.
Don't Rush Cure Times
Thinset needs 24–48 hours to cure before grouting, depending on the product and ambient temperature. Cold Boston winters extend cure times. An unheated space in February may need 48–72 hours before grouting is safe. Walking on tile before thinset cures shifts tiles and creates hollow spots.
Grout Timing and Application
Apply grout at the right consistency — it should hold its shape but not be crumbly. Work in small sections (4–6 square feet at a time). Clean haze with a barely damp sponge before it hardens. Epoxy grout sets faster than cement grout. In warm conditions, you may have as little as 20–30 minutes of working time. Have a helper if you're working with epoxy.
Lippage Prevention
Lippage — one tile sitting higher than its neighbor — is the most common complaint in DIY and low-quality tile jobs. Prevent it with:
- A flat substrate (variation no more than 1/8 inch over 10 feet per TCNA standards)
- Consistent thinset coverage and notch depth
- Tile leveling clips for any tile over 15 inches
- A straight edge or 4-foot level checked frequently during installation
Cold-Climate Considerations for Boston Homes
- Unheated spaces in winter: Thinset and grout should not be applied below 50°F. Provide temporary heat if needed.
- Freeze-thaw cycles for outdoor tile: Only use porcelain rated for outdoor and freeze-thaw exposure (look for "frost-resistant" or PEI V rating).
- Seasonal wood movement: Homes with wood-frame subfloors expand and contract more than concrete slab homes. Use uncoupling membranes and movement joints.
- Radiant heat systems: Use thinset and tile rated for radiant heat. DITRA-HEAT and Laticrete 254 Platinum are both rated for heated substrates.
Post-Installation Maintenance
- Seal cement grout with a penetrating sealer (like Mapei UltraCare Penetrating Plus) within 72 hours of installation and annually after that.
- Seal natural stone tile before grouting and annually or bi-annually depending on use.
- Inspect caulk joints at countertops, tub edges, and floor transitions annually. Re-caulk when cracking appears.
- Clean tile with a pH-neutral cleaner. Avoid vinegar or citrus-based cleaners on natural stone — acid etches polished surfaces permanently.
Tile installation done right by certified professionals requires minimal maintenance for years. At Aguirre Modern Tile, every installation includes a detailed care guide so you know exactly how to protect your investment. For more detail on any phase of a tile project, see our complete guide: Tile Installation: The Complete Guide for Homeowners.
Ready to start your tile project? Request a free bathroom, kitchen, or floor tile installation estimate from Aguirre Modern Tile — share your room type, square footage, and tile preference. We'll send a detailed written quote within one business day. We serve homeowners across Greater Boston, including Cambridge, Newton, Brookline, Somerville, and the North and South Shores.
